admin

Create Android Sample Application

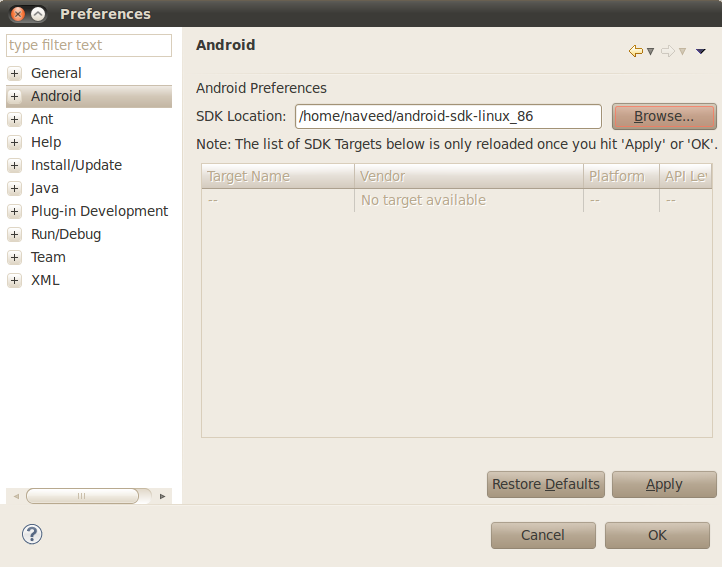
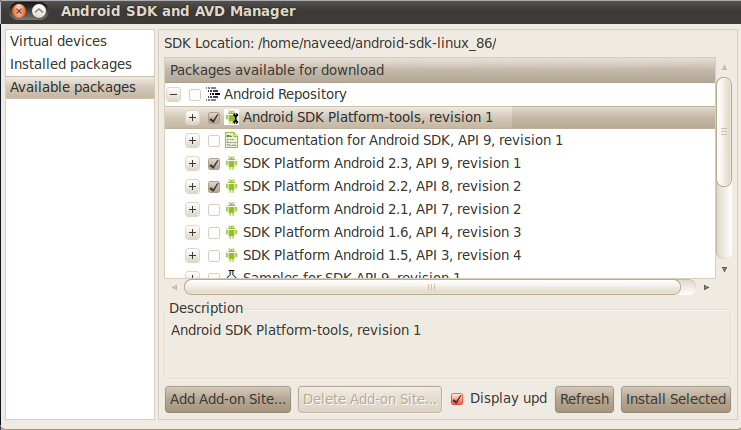
After setting up Android working environment we will start designing our own sample application, which we will test using Robotium in next section.

Our sample application would be a simple calculator to multiply two integer/decimal values. It will take two inputs and on clicking ‘Multiply’ it will show their multiply result.

For simplicity steps are categorized as,

1. Create Project
Click on File menu, select New and click on the Others,
from New window, Drag down to Android option, expand it, and select Android Project and Click on Next.


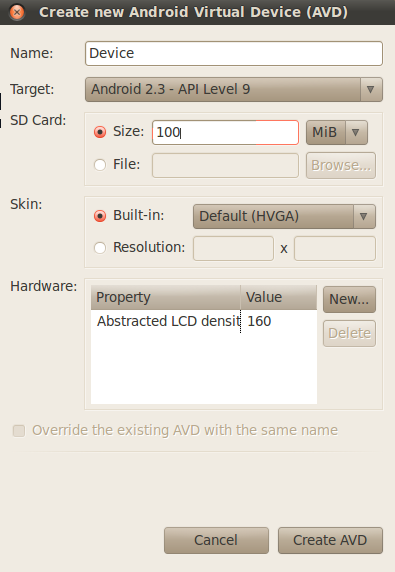
From New Android Project Window, enter Project Name as ‘AndroidCalculator’, From Contents section select ‘Create New Project in workspace’, Check Android 2.2 from Build Target section, Application Name ‘AndroidCalculator’, Package Name ‘com.calculator’, Create Activity ‘Main’ and ‘8’ as Min SDK Version

Note: you can enter any other options best suits to your need.

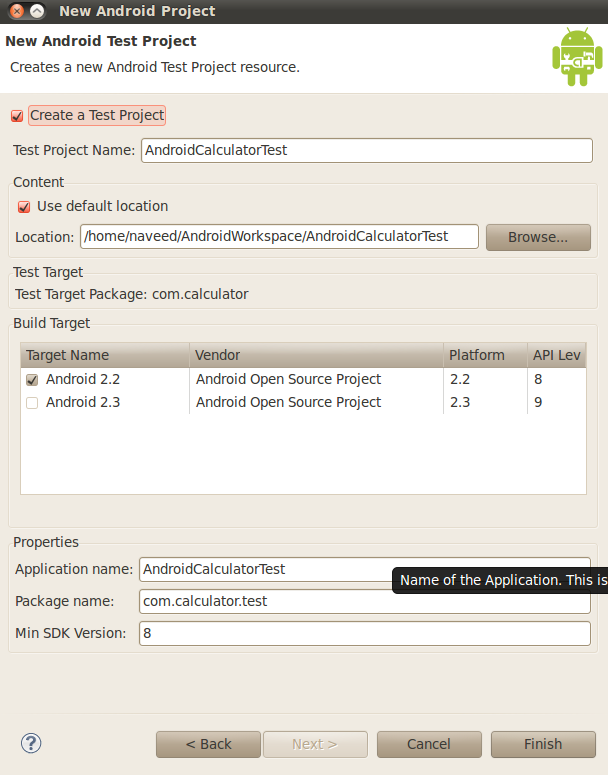
Click on Next and it will load New Android Project window eclipse offer you to create project to test your project, at this time we will avail it to test ‘AndroidCalculator’ we made in last step. We can skip this part by un-checking Create a Test Project option, if you want to manually create test project later, we will create test project right away.

2. Create Test Project
Check Create a Test Project and it will automatically fill rest of fields based on the last made project (AndroidCalculator), and click on Finish.


Note: As our current focus is to design sample project so for now, we will just create test project and in next section we will be working on this new created project to test AndroidCalculator.

After successfully creating projects, our Project explorer screen should look like,

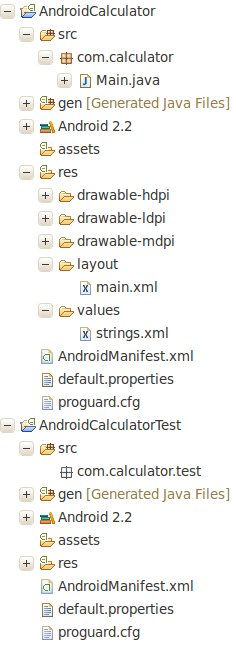
Now two projects are created, we will simply work on first project to design our sample calculator application.

3. Understand Project Architecture
Expand the src directory then expand com.calculator directory, Main.java file contains application logic. In rec directory we can define application’s UI interface. In Main.xml we can put controls on application interface and in string.xml we can define their string values,which would be visible on UI.

We would not get into details, as its not in our scope so far.

4. Design Layout
Get the code for main.xml and string.xml from Android Calculator Code

5. Design Application Logic
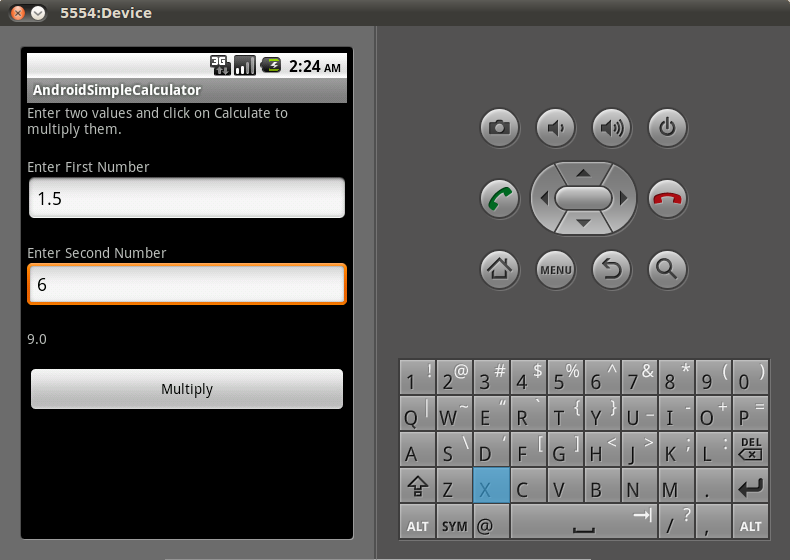
In Main.java enter following code and save it.Our application is designed and its time to run it.Right click on project select Run As and then select Android Application & and wait for while.It will load Android simulator, you need to wait for some time, it will launch application itself.

Our simple multiply calculator is ready, enter some integer/decimal values and click on Multiply, it will show the result above Click button.

Next: In next step we will work on AndroidCaculatorTest project to test that simple calculator. Download Android Calculator Code


Setup Android Working Enviroment

To work on android we need to setup working environment. Before setting up android environment we need to fulfill some basics like

* JDK must be installed (to install http://www.oracle.com/technetwork/java/javase/downloads/index.html)
* Eclipse for java must be installed (http://www.eclipse.org/downloads/)

We are expecting that eclipse is working fine.

1. Download Android SDK
It includes only the core Standard development Kit (SDK) Tools, which will help us in developing Android Applications.
Download Android SDK from http://developer.android.com/sdk/index.html
After downloading .zip or .tgz package (instead of the SDK installer), unpack it to a safe location on your machine.

We will be using it later on in coming steps.

2. Install Android development Tools (ADT)
In Eclipse From Help menu click on Install New Software option


Click on Add button and on Add Site window fill following url to download Android ADT, you can enter any name in Name field, and click on Ok button.


Eclipse will search for the available tools and show their list.


Select all tools and click on Next. It will start checking the things and will show list of tools which will be installed.


Click on Next button and after a license verification it will start downloading and may take some time depending upon the speed of Internet. After successfully installing it will ask to restart eclipse. Restart it.

3. Adding SDK Location
From Window menu click on Preferences there would be Android option visible (which is also assurance that android ADT is installed 🙂 ). Here we need to tell Eclipse where the Android SDK is located. So click on Android from list, and then browse it to the SDK unzipped directory and click on Ok.


4. Install SDK Latest Version
After that come up on Android SDK and AVD Manager from the Window menu. Select available packages and select the latest version of the SDK, in my case I will select followings, you can select based on your own choice and click on Install Selected to complete the installation, and restart eclipse after it.


During installation It would be looking like this.


5. Set Up Device
As we are almost done, last step is we need to set up device to work, real device can be attached, but we will be using simulator for the scope of our work. From eclipse interface click on this icon from top left side of IDE.

Select the option Virtual Devices and click on New.

On Android Virtual Device screen fill the followings and click on Create AVD.


It will show the device added in Android SDK and AVD manager screen

Now our setup is complete and we are ready to develop android applications. Click to Design Android Sample App

Configuring Blackberry JDE environment on Windows

On Windows If we have already installed JDK (Java Development Kit0 or JRE (Java Run time Environment), it happened some times that Blackberry JDE shows the message of “javac not found” when we click on ‘Build All’ option.

To solve this issue do following steps,
1. Start > My Computer (right click) select Properties

2. Click on Advance tab and then Environment Variables

3. Under User Variables section check that ‘JAVA_HOME’ variable is assigned value to the right installed jre installed directory like
JAVA_HOME C:Program FilesJavajdk1.6.0_20
If the path is not fine, click on Edit to change the path. Make sure the Variable name should be same in uppercase.

4. ‘PATH’ variable should redirect to the bin folder of your jre installed directory like
PATH C:Program FilesJavajdk1.6.0_20bin
it may contains some other path followed by semicolon like
PATH C:Program FilesJavajdk1.6.0_20bin;C:AppServApache2.2bin;C:AppServphp5;C:AppServMySQLbin
If the path is not fine, click on Edit to change the path. Make sure the Variable name should be same in uppercase.

After settings paths click on Ok to save the changes and restart your JDE. It should work fine now.

GenerateData – An open source data generator tool

Thanks to the Open Source Community for providing bunch of tools. It made our life so easy. I am software tester & during my work some times we need to generate some data for testing. Thanks to BenjaminKeen.com who provided Data Generator tool.

It is a web based tool with multiple options to generate data. Using it intelligently one make different

patterns. Generated data can be exported into multiple formats.

Features

  • (JS-enabled) browser-friendly.

  • Many data types available: names, phone numbers, email addresses, cities, states, provinces, counties, dates, street addresses, number ranges, alphanumeric strings, lorem ipsum text and more.

  • Option to generate data in XML, Excel, HTML, CSV or SQL.

  • Country specific data (state / province / county) for Canada, US, Netherlands and UK.

  • Does your laundry.

  • Saves your data generation forms for later use (downloadable version & for donators only)

It can be used on line, and one can also deploy it on its own machine with some normal requirements.

Any one can install it will following simple steps,

By using data generator we can use any number of records with any number of columns. If we need to generate data for user registration form like,

After defining columns with their required input type simple click on Generate button, and see its magic 🙂

We can use that data in manual and automate testing, and on many other areas.

HP Quick Test Professional

I found HP Quick Test Professional good tool. Its functional testing tool which use VB Script. You can write your own scripts to execute your test cases. It can be used for the Java, Dot Net and many more application interfaces.
Its good tool for beginners in Software Quality Assurance Industry.

Please share if some one have more to share on.

Quality is never free

I don’t have too much experience in Software Quality Assurance but it Got in this short time that “Quality is not free”.

We have to pay for quality sometimes in terms of money and sometimes more than money.