Automation

Selenium WebDriver : getSize() Vs getLocation()

In Selenium WebDriver getSize() and getLocation() methods are different:

getSize() : will return the “Dimension” object, from which we can get Height and Width of specific element
Dimension vDimesions = vDriver.findElement(By.id(“id“)).getSize();
System.out.println(“Height :” + vDimesions.height + ”Width : “+ vDimesions.width);

getLocation() : will return the “Point” object, from which we can get X and Y coordinates of specific element
Point vPoint=driver.findElement(By.id(“id”)).getLocation();

System.out.println(“X : “+ vPoint.x + “Y : “+ vPoint.y);

Playing with Android Application controls through Robotium Part 1

Android application is combination of multiple controls respective to functionality like to show text on screen developers use TextView, to show input field they use EditText, to show button they use Button and many other controls as

1. TextView To show text

2. EditText To show input field

3. Button To show button

4. ImageView To show multimedia image

5. ImageButton To show Image button

Each control has its own class comprise of multiple functions to work intelligently. Robotium is automated testing tool for Android applications. It identifies the control used on screen and allow user to interact with control through different ways. Robotium api provides the solo class which contains long list of functions to simulate real user actions on controls like Click, LongClick, Drag, Scroll up, Scroll Down, Click on ToggleButton etc..

To automate Android application test engineer can use both

1. Control’s native class

2. Robotium functions list for that specific controls

Like to work with TextView test engineer can use the TextView class and Robotium functions for TextView like getText, getCurrentTextViews(parent) and many others. Combination of both can make almost everything possible to automate android applications.

For new test engineers it’s quite tough to work intelligently with controls used on screen unless they know controls in brief. In this discussion/tutorial we will take each control one by one, explain its use and try to find out the combination of tricks we can use to work intelligently with these controls.

1. TextView

TextView is used to show text on screen, there can be any number of TextView controls on a screen depends upon the need of UI like a list showing results in rows may contains single TextView on each row or multiple on each row. We will go through each possible scenario and try to work with it

If there are 2 TextView controls on a screen to get their values we can use following Robotium function

String vTextViewValue = solo.getText(index).toString();

Index shows the number of TextView control used on screen, for first TextView it will be 0,

String vTextViewValue1 = solo.getText(0).toString();

and for second text view it will be 1 like.

String vTextViewValue2 = solo.getText(1).toString();

If there is a TextView control with some text we can get it using

TextView vTextView = solo.getText(“text”);

getText(“text”) will search and return the TextView control on screen matching the “text”. vTextView can use all functions of TextView class like to getId, getScaleX, getScaleY, getCurrentTextColor etc.

If there are many TextView controls in a list on a screen we will get the list on screen and then all TextView controls in that list,

ListView lvResults = solo.getCurrentListViews().get(0);

ArrayList vTextViewResults = solo.getCurrentTextViews(lvResults);

First line is getting the first list used on screen, and second line it getting all TextView controls in ArrayList. All TextView controls in specific list are stored in ArrayList, one can easily work with them.

2. EditText

EditText is used to enter text on screen, there can be any number of EditText controls on a screen depends upon the need of UI. Using Robotium we can write in EditTex and also get already written value. We will go through each possible scenario and try to work with it

If we need to enter some value in EditText on screen, we can write by using

solo.enterText(index, “value”);

the index parameter is used to call the number of Edit/Text on screen, like if there are two EditText controls on a login screen 0 is for first one and 1 is for second one on login screen,

solo.enterText(0, “username”);

solo.enterText(1, “password”);

If we want to get already written value in some EditText we can

String vEditTextValue = solo.getText(0).getText().toString();

the 0 represent the first EditText on screen, and value is saved in vEditTextValue variable. We can get the value of any EditText on screen by entering its index.

If there are many EditText controls on a screen we will get all EditText controls like,

ArrayList vEditTextesults = solo.getCurrentTextViews();

Above line will get all EditText controls on screen and save them in ArrayList, one can easily work with them.

We can get EditText like

EditText vEditText = solo.getEditText(index);

index is number of control on screen, it will return the EditText object and all functions of EditText Class of Android SDK are available to use.

We can also get EditText like

EditText vEditText = solo.getEditText(string);

string is value of control on screen, it will return the EditText object and all functions of EditText Class of Android SDK are available to use.

3. Button

Button is used on screen to click on some action, through Robotium user can click on button by,

solo.clickOnButton(index);

index shows the number of buttons on screen, if user needs to click on first button there will be 0 in place of index & 1 in case of second button on screen.

User can also click on button by identifying text written on screen like

solo.clickOnButton(string);

String shows the text visible on button, like if user needs to click on ‘Submit’ button there will be

will be

solo.clickOnButton(“Submit”);

User can also get all buttons on screen if there are many like

ArrayList vButtons = solo.getCurrentButtons();

Above line will get all Button controls on screen and save them in ArrayList, one can easily work with them.

We can get button like

Button vButton = solo.getButton(0);

0 represents the first button on screen; there will be 1 if user needs to interact with second button on screen. It will return the Button object and all functions of Button Class of Android SDK are available to use.

We can also get button like

Button vButton = solo.getButton(string);

string represents the text on button, there will be “Submit” if user needs to interact with Submit button on screen. it will return the Button object and all functions of Button Class of Android SDK are available to use.

4. ImageView

Images are used to show graphics on screen, Through Robotium user can interact with images easily

User can click on image like that, index shows the number of image on screen, user will enter 0 if there needs to click on first image on screen, and 1 if it needs to click on second image on screen

solo.clickOnImage(index)

If there are many ImageView controls on screen, user can get all of the them through Robotium like,

ArrayList vImageView = solo.getCurrentImageViews();

Above line will get all ImageView controls on screen and save them in ArrayList, one can easily work with them.

We can get button like

ImageView vImageView = solo.getImage(index);

0 represents the first image on screen; there will be 1 if user needs to interact with second button on screen. it will return the ImageView object and all functions of ImageView Class of Android SDK are available to use.

5. ImageButton

There can be button images used in Andorid Applications, Through Robotium user can easily interact with them.

User can click on imageButton like that,

solo.clickOnImageButton(index);

index shows the number of imageButton on screen, user will enter 0 if there needs to click on first imageButton on screen, and 1 if it needs to click on second imageButton on screen

If there are many ImageButton controls on screen, user can get all of the them through Robotium like,

ArrayList vImageButton = solo.getCurrentImageButtons();

Above line will get all ImageButton controls on screen and save them in ArrayList, one can easily work with them.

We can get button like

ImageButton vImageButton = solo.getImageButton(index);

0 represents the first ImageButton on screen; there will be 1 if user needs to interact with second button on screen. it will return the ImageButton object and all functions of ImageButton Class of Android SDK are available to use.

Note: Soon will upload the next parts with more controls

Test Android apk file with Robotium

In our last tutorials we have created AndroidCalculator and tested it through eclipse using AndroidCalculatorTest project as Thanks to Robotium as it provides multiple ways to test Android applications. So if you are not familiar with basic coding (which is prerequisite of White Box Testing) then Robotium provides the way to test apk file as well.
We will test the AndroidCalculator apk file, initially we will install AndroidCalculator apk file on device then we will create project on eclipse to test it.

Note:we should have android working environment to work on, you can find tutorial to Set up Android Working Environment.

1. Install APK

We will install android apk file on Android simulator, real device can also be used but its not on scope of our tutorial. Before installing apk file we must make sure that apk file is signed in debug mode, if not follow next step. If apk file has debug mode signatures then skip this step and move on the Load Emulator.

Sign Apk file in debug mode

The apk file must have the same certificate signature that your test project has. The signature will identify the author of the android application. Signature means it contains the information like first name and last name of the developer, Name of the organizational unit, organization, city, state, two-letter country code. Standard tools like Keytool and Jarsigner are used to generate keys and sign applications. For more help visit: http://developer.android.com/guide/publishing/app-signing.html

Important Steps:
* If you know the certificate signature then you need to use the same signature in your test project
* If you do not know the certificate signature then you need to delete the certificate signature and you should use the same android debug key signature in both the application and the test project
* If the application is unsigned then you need to sign the application apk with the android debug key

If the application is signed then you can use the following drag and drop java program to resign it: http://www.troido.de/re-sign.jar
Or
* Un-zip the apk file
* Delete the META-¬INF folder
* Re‐zip the apk file
* In Dos prompt/Terminal write following commands

> arsigner -keystore ~/.android/debug.keystore -storepass android -keypass android ApplicationToTest.apk androiddebugkey
> zipalign 4 ApplicationToTest.apk TempApplicationToTest.apk

Then rename TempApplicationToTest.apk to ApplicationToTest.apk. If it is an unsigned application then, In Dos prompt/Terminal write following commands

> jarsigner -keystore ~/.android/debug.keystore -storepass android -keypass android ApplicationToTest.apk androiddebugkey
> zipalign 4 ApplicationToTest.apk TempApplicationToTest.apk

Then rename TempApplicationToTest.apk to ApplicationToTest.apk For more help visit: http://developer.android.com/guide/publishing/app-signing.html

Load Emulator

Load command prompt (windows user) or Terminal (Linux users) and write following command to run emulator

emulator -avd

here the Device Name is our AVD (Android Virtual Device) we created in Set up Android Working Environment, it will load the emulator give it some time to load.
If it shows some error most probably the PATH would not be set for Android SDK. Follow the below Set up Android SDK path if not working, you can skip this step if your emulator is working.

Set Up Android SDK Path

Follow the section suits your OS (Operating System) to set SDK path

Linux (ubuntu)
Load terminal and write

echo $PATH

(it will print value of PATH, if Android SDK path is not visible move on next step to add path). To set path enter following command

sudo gedit /etc/bash.bashrc (it will ask password, enter the password)

It will load bash.bashrc file into gedit (text editor) and at end of file add following lines into file and save it.

Note: it is showing the path for all tools necessary for android, based on my current system directory, you need to replace with your own path where Android SDK resides.

export PATH=${PATH}:/home/naveed/android-sdk/
export PATH=${PATH}:/home/naveed/android-sdk/platforms/android-8/tools/
export PATH=${PATH}:/home/naveed/android-sdk/tools/
export PATH=${PATH}:/home/naveed/android-sdk/platform-tools/

now reload the Termial and run emulator -avd Device command again it will load emulator.

Windows
Load Command Prompt and write

echo $PATH

(it will print value of PATH, if Android SDK path is not visible move on next step to set path). To set path enter following commands one by one

sett PATH=${PATH}:c:/naveed/android-sdk/
set PATH=${PATH}:c:/naveed/android-sdk/platforms/android-8/tools/
set PATH=${PATH}:c:/naveed/android-sdk/tools
set PATH=${PATH}:c:/naveed/android-sdk/platform-tools/

Note: it is showing the path for all tools necessary for android, based on my current system directory, you need to replace with your own path where Android SDK resides.

now reload the Command Prompt and run

emulator -avd

Now it will load emulator. After the emulator is working, load another instance of command prompt/terminal (based on your os), and write following command to install AndroidCalculator apk on emulator

adb install /AndroidCalculator.apk

the is showing the directory where AndroidCalculator.apk is located, in may case it was

adb install /home/naveed/AndroidCalculator.apk

as apk is at my home directory ( I am using ubuntu). You need to enter your own path where apk resides. It will successfully install apk file and show success message you can load the AndroidCalculator application and try running it.

2. Create Test Project

Click on File menu, select New and click on the Others,
From New window, Drag down to Android option, expand it, and select Android Test Project and Click on Next.
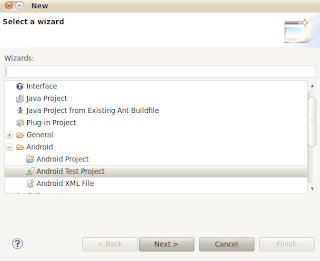
Note: As we are going to create test project to test AndroidCalculator apk so we must be care full with the Package name, our package name should be with the parent node of our apk application’s package like our package name of our AndoridCalculator was com.calculator, so our test project should be with in the parent node (com), like we will put the package name for test project as com.testcalculator or we can also create package like com.calculator.testapk.

So please be careful while entering the package name.
If you do not know the exact package name of AUT (Application Under Test) then type following commands in the DOS prompt /Terminal after launching emulator

> adb install testapplication.apk
> adb logcat

Run the application once and you will get the exact package name in logcat window
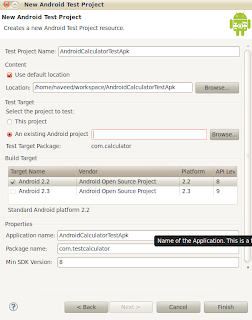
From New Android Project Window, enter Test Project Name as ‘AndroidCalculatorTestApk’, Check Android 2.2 from Build Target section, Application Name ‘AndroidCalculatorTestApk’, Package Name ‘com.testcalculator’, ‘8’ as Min SDK Version and click on Finish.
3. Create Test Class

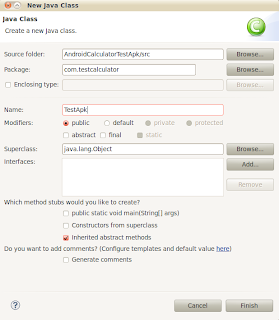
Right click on com.testcalculator package, from New click on Class to add class. We will write our code to test AndroidCalculator apk. Enter class name TestApk (you can put and any name suits you) and click on Finish.
4. Code Test Class

Enter following code into new created TestApk file and save it.

package com.testcalculator;

import com.jayway.android.robotium.solo.Solo;
import android.test.ActivityInstrumentationTestCase2;

@SuppressWarnings(“unchecked”)
public class TestApk extends ActivityInstrumentationTestCase2{

private static final String = TARGET_PACKAGE_ID=”com.calculator”;
private static final String = LAUNCHER_ACTIVITY_FULL_CLASSNAME=”com.calculator.Main”;
private static ClasslauncherActivityClass;

static{

try
{
launcherActivityClass=Class.forName(LAUNCHER_ACTIVITY_FULL_CLASSNAME);
} catch (ClassNotFoundException e){
throw new RuntimeException(e);
}
}

public TestApk()throws ClassNotFoundException{
super(TARGET_PACKAGE_ID,launcherActivityClass);
}

private Solo solo;

@Override
protected void setUp() throws Exception
{
solo = new Solo(getInstrumentation(),getActivity());
}

public void testDisplayBlackBox() {

//Enter any interger/decimal value for first editfield, we are writting 10
solo.enterText(0, “10”);

//Enter any interger/decimal value for first editfield, we are writting 20
solo.enterText(1, “20”);

//Click on Multiply button
solo.clickOnButton(“Multiply”);

//Verify that resultant of 10 x 20
assertTrue(solo.searchText(“200”));
}

@Override
public void tearDown() throws Exception
{
try
{
solo.finalize();
}
catch (Throwable e)
{
e.printStackTrace();
}

getActivity().finish();
super.tearDown();
}
}

5. Add Robotium jar

We need to reference the Robotium jar to our project. Right click on project select Build Path, and then click on Configure Build Path option. On Properties window click on Libraries tab and add Robotium jar into project.

We can download Robotium jar from http://code.google.com/p/robotium/downloads/list
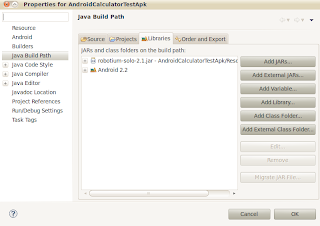
6.Targeting AndroidManifest.xml to apk

From project explorer window open AndroidManifest.xml file. Our AndroidManifest.xml will look like

7. Run your test

Its time to run test, now right click on AndroidCalculatorTestApk project and Run As AndroidJUnit Test. Wait for some time, it will load AndroidCalculator.apk (installed on emulator)

* Enter the first & second values into editfields
* Click on Multiply button
* Verify their multiply value.

After complete verification it will show the report like below.
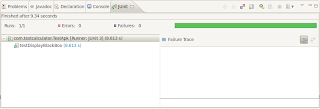

We can also run our test using command prompt/termial by follwoing simple steps

* Write following command to install AndroidCalculator apk on emulator
> adb install /AndroidCalculator.apk

* Write following command to install AndroidCalculatorTest apk on emulator
> adb install /AndroidCalculatorTest.apk

* Run the test cases:
> adb shell am instrument ‐w com.testcalculator/android.test.InstrumentationTestRunner

Setup Android Working Enviroment

To work on android we need to setup working environment. Before setting up android environment we need to fulfill some basics like

* JDK must be installed (to install http://www.oracle.com/technetwork/java/javase/downloads/index.html)
* Eclipse for java must be installed (http://www.eclipse.org/downloads/)

We are expecting that eclipse is working fine.

1. Download Android SDK
It includes only the core Standard development Kit (SDK) Tools, which will help us in developing Android Applications.
Download Android SDK from http://developer.android.com/sdk/index.html
After downloading .zip or .tgz package (instead of the SDK installer), unpack it to a safe location on your machine.

We will be using it later on in coming steps.

2. Install Android development Tools (ADT)
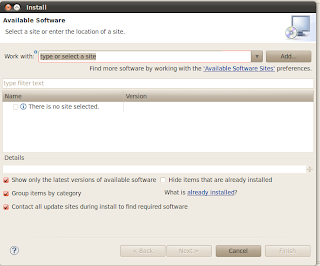
In Eclipse From Help menu click on Install New Software option


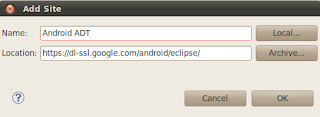
Click on Add button and on Add Site window fill following url to download Android ADT, you can enter any name in Name field, and click on Ok button.


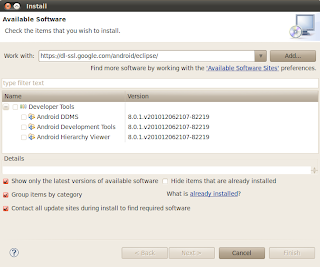
Eclipse will search for the available tools and show their list.


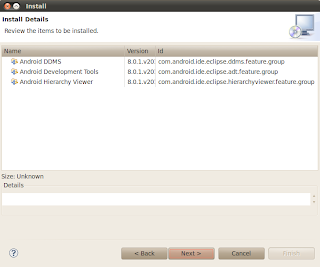
Select all tools and click on Next. It will start checking the things and will show list of tools which will be installed.


Click on Next button and after a license verification it will start downloading and may take some time depending upon the speed of Internet. After successfully installing it will ask to restart eclipse. Restart it.

3. Adding SDK Location
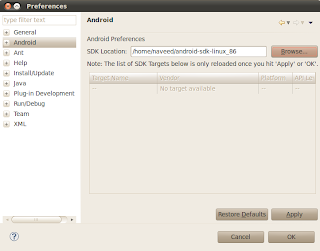
From Window menu click on Preferences there would be Android option visible (which is also assurance that android ADT is installed 🙂 ). Here we need to tell Eclipse where the Android SDK is located. So click on Android from list, and then browse it to the SDK unzipped directory and click on Ok.


4. Install SDK Latest Version
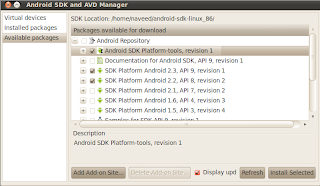
After that come up on Android SDK and AVD Manager from the Window menu. Select available packages and select the latest version of the SDK, in my case I will select followings, you can select based on your own choice and click on Install Selected to complete the installation, and restart eclipse after it.


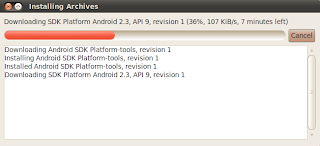
During installation It would be looking like this.


5. Set Up Device
As we are almost done, last step is we need to set up device to work, real device can be attached, but we will be using simulator for the scope of our work. From eclipse interface click on this icon from top left side of IDE.

Select the option Virtual Devices and click on New.

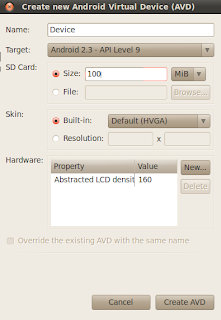
On Android Virtual Device screen fill the followings and click on Create AVD.


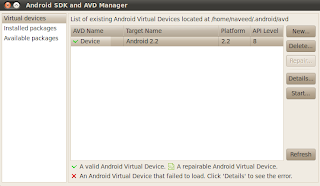
It will show the device added in Android SDK and AVD manager screen

Now our setup is complete and we are ready to develop android applications. Click to Design Android Sample App