Testing Tools

Selenium WebDriver : getSize() Vs getLocation()

In Selenium WebDriver getSize() and getLocation() methods are different:

getSize() : will return the “Dimension” object, from which we can get Height and Width of specific element
Dimension vDimesions = vDriver.findElement(By.id(“id“)).getSize();
System.out.println(“Height :” + vDimesions.height + ”Width : “+ vDimesions.width);

getLocation() : will return the “Point” object, from which we can get X and Y coordinates of specific element
Point vPoint=driver.findElement(By.id(“id”)).getLocation();

System.out.println(“X : “+ vPoint.x + “Y : “+ vPoint.y);

Running Robotium Test Project using Ant

Pre-Reqs:

– JDK should be installed with JAVA_HOME evnrionment variable set
– Ant – can be found on Apache
–  Working Robotium Test Project, one can find already desinged sample TestProject here
–  Make sure that all required jars are in libs directory and added from build path setting of Eclipse
– Device/emulator should be connected to pc

Lets Start:

1. In Eclipse workspace having testProject, run the following command to set up Ant for the app project:

android update project -p [TestProject Path]

android tool is used to create/update projects, we need to update our exisiting project. it will generate any required files and folders that are either missing or need to be updated.

2. Next step is to link test project with AUT(Application Under Test). Note that the path given to -m must be the relative path to the project under test, seen from the test project, not the workspace:

android update test-project -m [../ProjectPath] -p [Testproject path]

3. To setup library projects

android update lib-project –target “Google Inc.:Google APIs:17” –path [path]

4. Refresh the projects in Eclipse

5. Test if you can build the app project with

ant clean debug

It should come up with “BUILD Successfull” status

6. Run the last command

ant clean debug install test

It will make all necessary installations and run testProject, see the command line for results. 


Understanding Android Hierarchyviewer Tool

Using Android SDK Hierarchy Viewer

Automating Android app calls for many limitations of different types. During writing test cases using Robotium we have two choices

  • If AUT source code is available, we know the contents used within the application, and it’s pretty easy to work with these contents using Robotium
  • If we don’t have AUT (Application Under Test) code, there is only apk file available, we neither have much idea about the contents used within the app nor even sure about the properties bind with contents and their values, so we have to stay with situation with some assumptions
Android SDK has made software Testers’ life easy by providing a useful tool “Hierarchy Viewer”. It shows the hierarchical view of all contents used within the running screen of app along with their details (id, Name, Positions and all other Properties with their values).  
Note: Before starting, we must insure that Android Environment is properly setup and working fine. Please setup the environment by clicking here.

Run Hierarchy Viewer

To run Hierarchy Viewer, follow these steps:

  • Launch an emulator.

-To preserve security, Hierarchy Viewer can only connect to devices running a developer version of the Android system.

  • If you have not done so already, install the application you want to work with. To make things simple we would be usingNotes App”, it is one of the sample apps bundled in Android SDK with source code.
  • Run the Notes application, and ensure that its UI is visible.
  • From a terminal, launch hierarchyviewer  or double click on hierarchyviewer.h from the /tools/ directory
  • The first window you see displays a list of devices and emulators. To expand the list of Activity objects for a device or emulator, click the arrow on the left. This displays a list of the Activity objects whose UI is currently visible on the device or emulator. The objects are listed by their Android component name. The list includes both your application Activity and system Activity objects.


Following is figure showing packages of all app running on device, select package of Notes app and click on Load View Hierarchy button

You can now look at its view hierarchy using the View Hierarchy window, or look at a magnified image of the UI using the Pixel Perfect window.

We can have more technical details of Hierarchy Viewer on Android SDK website .
On selecting any of the content it will load its details, Notes is a simple application, in case of complex applications, we can understand power of hierarchy viewer more.

UI Identification of Contents on AUT

Using Notes app one can create and manage multiple notes easily. App contains following screens

  • NotesList screen to show list of created  notes
  • NoteEditor screen to create and edit notes
  • TitleEditor screen to edit title of specific note

Each screen contains some contents to perform specific functionality. These contents could me TestView, EditView, ImageView, button etc..

To test Notes app using Robotium we need to know about contents in details, then we can perform actions on contents. Going through app from device/emulator only shows visible contents, but if some contents are hidden to arrange/organize layouts device will not show it.

hierarchy viewer tool can be used to cover this gap, it shows all contents used on screen in hierarchy.

We will go through each screen of app from device then hierarchy viewer view to get idea about contents used

Empty NoteList Screen
NoteList screen shows following contents on device

  • imageview to show “Notes” icon
  • textview to show text “Notes”
  • imageview to show “Create Note” icon
hierarchy viewer will show following contents hierarchy section of above screen


it is showing following contents

  • textview to show “Notes”
  • textview to show sub title which is hidden
  • imageview to show “Notes” icon
  • imagebutton to show “Create Notes” icon
  • Button with text “New Note” which is also hidden

Contents in bold are basically made hidden, that’s why these are not visible on device, and we don’t even sure about the properties bind with all of them.

On hierarchy view each block represent a content, on tapping any content will load its position view, layout view and all parameters with their values including name, id, position, style, size etc.


NoteList with some notes
When there are some notes added, the notelist screen would look like

  • imageview to show “Notes” icon
  • textview to show text “Notes” text
  • imageview to show “Create Note” icon
  • textview to show “Monthly Notes” text
  • textview to show “Weekly Lists”text
  • textview to show “Today List” text

hierarchy viewer will show following contents hierarchy of above screen
It will show following contents

  • textview to show “Notes” text
  • textview to show sub title which is hidden
  • imageview to show “Notes” icon
  • imagebutton to show “Create Notes” icon
  • Button with text “New Note” which is also hidden
  • listview to show following notes list
  • textview to show “Monthly Notes” text
  • textview to show “Weekly List” text
  • textview to show “Today List” text

Contents in bold are basically made hidden, that’s why these are not visible on device, and we don’t even sure about the properties bind with all of them.

On hierarchy view each block represent a content, on tapping any content will load its position view, layout view and all parameters with their values including name, id, position, style, size etc.

NoteEditor Screen
NoteEditor screen shows following contents on device

It gives following idea about contents

  • imageview to show “Notes” icon
  • textview to show text “Edit: Weekly List” text
  • imageview to show “Create Note” icon
  • imageview to show “Delete Note” icon
  • textview to show “Monthly Notes” text
  • textview to show “Weekly List” text
  • textview to show “1. Task one” text
  • textview to show “2. Task two” text
  • textview to show “3. Task three” text
  • textview to show “4. Task four” text
  • textview to show “5. Task five” text

hierarchy viewer will show following contents hierarchy of above screen,

It gives following idea about contents

  • imageview to show “Notes” icon
  • textview to show text “Edit: Weekly List” text
  • textview is hidden for space
  • imageview to show “Create Note” icon
  • Button with text “Save” which is also hidden
  • imageview to show “Delete Note” icon
  • Button with text “Delete” which is also hidden
  • note to show note contents

Contents in bold are basically made hidden, that’s why these are not visible on device, and we don’t even sure about the properties bind with all of them.

On hierarchy view widow each block represent a content, on tapping any content will load its position view, layout view and all parameters with their values.


TitleEditor Screen
TitleEditor screen shows following contents on device

It gives following idea about contents

  • textview to show “Note title” text
  • editview to show “Weekly List” text
  • button with text “Ok”

hierarchy viewer will show following contents hierarchy of above screen

It gives following idea about contents

  • textview to show “Note title” text
  • editview to show “Weekly List”
  • button with text “Ok”

On hierarchy view widow each block represent a content, on tapping any content will load its position view, layout view and all parameters with their values.


From above screens we can understand contents which are visible & hidden as we don’t have much idea about their Name, Id and other properties. Thanks to Robotium which provides us the way of calling contents by their indexes like in above screen, to enter some value in first EditFiled, we can write following line of code
solo.enterText(0, “10”);
Where the 0 represents the index or number of content on screen, as it is first EditField on screen, same we have to do with other controls.

This is fine so far and also works fine in simple cases, but suppose if there is some hidden content used within the app then how will we decide what is its index, and we will face issues in case. Hierarchy Viewer tool has covered this gap and know we can get detailed info about all parameters associated with any content.

Test Android Apk with Robotium Using Eclipse Indigo – Latest

Test Android apk file with Robotium
To test an Android apk file using Robotium, it requires to

  • Install apk file on device we will use AndroidCalculator apk file, click here to find apk
  • Create Test Project using eclipse to test that apk


Note: If android working environment is not set on your machine, follow Set up Android Working Environment

1. Install AUT (Application Under Test) APK
Apk file can be installed on device or emulator. Before installing it needs to make sure that apk file is signed in debug mode. If not it can be signed as debug mode in next steps.
If apk file already has debug mode signatures skip next steps and jump to Load Emulator section.
Note: if you are not sure about the current signed mode of apk file, it’s better to resign it.

Sign Apk file in debug mode
The apk file must have the same certificate signature that your test project has. The signature will identify the author of the android application. Signature means it contains the information like First Name and Last Name of the developer, Name of the Organizational Unit, Organization, City, State, two-letter Country Code. We will un-sign already signed apk file and then again sign it with debug key. Standard tools like Keytool and Jarsigner are used to generate keys and sign applications. For more help visit: http://developer.android.com/guide/publishing/app-signing.html

Important Steps:
1.If you know the certificate signature then use the same signature in test project
2. If you do not know the certificate signature then delete the certificate signature and use the same android debug key signature in both the application and the test project
3. If the application is unsigned then sign the application apk with the android debug key

To un-signed a signed application download java program from http://www.troido.de/re-sign.jar double click on it to open it and drop apk file on it
Or
* Un-zip the apk file
* Delete the META-¬INF folder
* Re‐zip the apk file

It will zip file as “applicationName.apk.zip” , rename it and make it as “applicationName.apk”
* In Dos prompt/Terminal write following commands

> jarsigner -keystore ~/.android/debug.keystore -storepass android -keypass android
applicationName.apk androiddebugkey
> zipalign 4
applicationName.apk TempApplicationName.apk

Then rename TempApplicationName.apk to applicationName.apk if you need.

For more help visit: http://developer.android.com/guide/publishing/app-signing.html

Load Emulator
Load command prompt (windows user) or Terminal (Linux users) and write following command to run emulator
emulator -avd
here the Device Name is our AVD (Android Virtual Device) created in Set up Android Working Environment, it will load emulator in few seconds.
If it shows some error most probably the Android SDK path in not set in PATH environment variable. One can set up Android SDK path in next step, skip next step if emulator is working


Set Up Android SDK Path

Follow the section suits your OS (Operating System) to set SDK path

Linux (ubuntu)
Load terminal and write

echo $PATH

(it will print value of PATH, if Android SDK path is not visible move on next step to add path). To set path enter following command

sudo gedit /etc/bash.bashrc (it will ask password, enter the password)

It will load bash.bashrc file into gedit (text editor) and at end of file add following lines into file and save it.

Note: it is showing the path for all tools necessary for android, based on my current system directory; you need to replace with your own path where Android SDK resides

export PATH=${PATH}:/home/naveed/android-sdk/
export PATH=${PATH}:/home/naveed/android-sdk/tools/
export PATH=${PATH}:/home/naveed/android-sdk/platform-tools/

now reload the Terminal and run emulator -avd command again it will load emulator

Windows
Load Command Prompt and write

echo %PATH%

(it will print value of PATH, if Android SDK path is not visible move on next step to set path). To set path enter following commands one by one

set PATH=${PATH}:c:/naveed/android-sdk/
set PATH=${PATH}:c:/naveed/android-sdk/tools
set PATH=${PATH}:c:/naveed/android-sdk/platform-tools/

Note: it is showing the path for all tools necessary for android, based on my current system directory, you need to replace with your own path where Android SDK resides

Now reload the Command Prompt and run

emulator -avd

now it will load emulator

Install AUT apk on Emulator

After the emulator is working, we can now install AUT (application under Test) apk on emulator. To install apk load another instance of command prompt/terminal (based on your os), and write following command to install AndroidCalculator apk on emulator

adb install /AndroidCalculator.apk

the showing the directory where AndroidCalculator.apk is located, in my case it was

adb install /home/naveed/AndroidCalculator.apk

as apk is at my home directory ( I am using ubuntu). You need to enter your own path where apk resides. It will successfully install apk file and show success

Note: For sake of understanding Test Project app will be installed on emulator which will then call/load the AUT (already installed) and perform test scenarios on it. When we will run our Test project through Eclipse it will automatically install it on emulator (will do it in coming sections)

2. Create Test Project

Click on File menu, select New and click on the Others,
From
New window, Drag down to Android option, expand it, and select Android Test Project and Click on Next


From ‘New Android Project’ Window, enter Test Project Name as ‘TestProject’, and click on ‘Next’


On next window under ‘Select TestTarget’ section select ‘This project’ option & click ‘Next’


On ‘Next’ window under ‘Select Build Target’ section select your desired SDK version, we can select Android 2.3.3 or latest of your choice & press Finish.

Eclipse will create TestProject with no package,


To manually create package right click on project select New > Package. On ‘New Java Package’ window fill package name against ‘Name:’. Like to test AndroidCalculator which has com.calculator package name, TestProject should be com.testcalculator or com.calculator.test package name


3. Create Test Class
Right click on com.testcalculator package, from New click on Class to add class. Enter class name TestApk (one can put and any name suits) and click on Finish


4. Code Test Class
Enter following code into new created TestApk class and save it

package com.testcalculator;

import com.jayway.android.robotium.solo.Solo;
import android.test.ActivityInstrumentationTestCase2;

@SuppressWarnings(“unchecked”)
public class TestApk extends ActivityInstrumentationTestCase2{

private static final String TARGET_PACKAGE_ID=”com.calculator”;
private static final String LAUNCHER_ACTIVITY_FULL_CLASSNAME=”com.calculator.Main”;
private static Class launcherActivityClass;
static{


try
{
launcherActivityClass=Class.forName(LAUNCHER_ACTIVITY_FULL_CLASSNAME);
} catch (ClassNotFoundException e){
throw new RuntimeException(e);
}
}

public TestApk()throws ClassNotFoundException{
super(TARGET_PACKAGE_ID,launcherActivityClass);
}

private Solo solo;

@Override
protected void setUp() throws Exception
{
solo = new Solo(getInstrumentation(),getActivity());
}

public void testDisplayBlackBox() {
//Enter any integer/decimal value for first editfield, we are writing 10
solo.enterText(0, “10”);

//Enter any interger/decimal value for first editfield, we are writing 20
solo.enterText(1, “20”);

//Click on Multiply button
solo.clickOnButton(“Multiply”);

//Verify that resultant of 10 x 20
assertTrue(solo.searchText(“200”));
}

@Override

public void tearDown() throws Exception {
solo.finishOpenedActivities();
}

5. Add Robotium jar
Right click on project (AndroidCalculatorTestApk) select Build Path, and then click on Configure Build Path option. On Properties window click on Libraries tab and add Robotium jar into project

Download Robotium jar from http://code.google.com/p/robotium/downloads/list


6. Targeting AndroidManifest.xml to apk
From project explorer window open AndroidManifest.xml file


Put ‘com.calculator’ as value of following parameter like above
< span=””>“com.calculator”

7. Run your test
Its time to run test, now right click on AndroidCalculatorTestApk project and Run As AndroidJUnit Test. Wait for some time, it will automatically load AndroidCalculator.apk (installed on emulator) and
* Enter the first & second values into editfields
* Click on Multiply button
* Verify their multiply value

After complete verification it will show the report like below


Test can also be run using command prompt/terminal by following simple steps

* Write following command to install AndroidCalculator apk on emulator
> adb install /AndroidCalculator.apk

* Write following command to install AndroidCalculatorTest apk on emulator
> adb install /AndroidCalculatorTestApk.apk

* Run the test cases:
> adb shell am instrument ‐w com.testcalculator/android.test.InstrumentationTestRunner

Note: Click here to download TestProject project source code

Playing with Android Application controls through Robotium Part 1

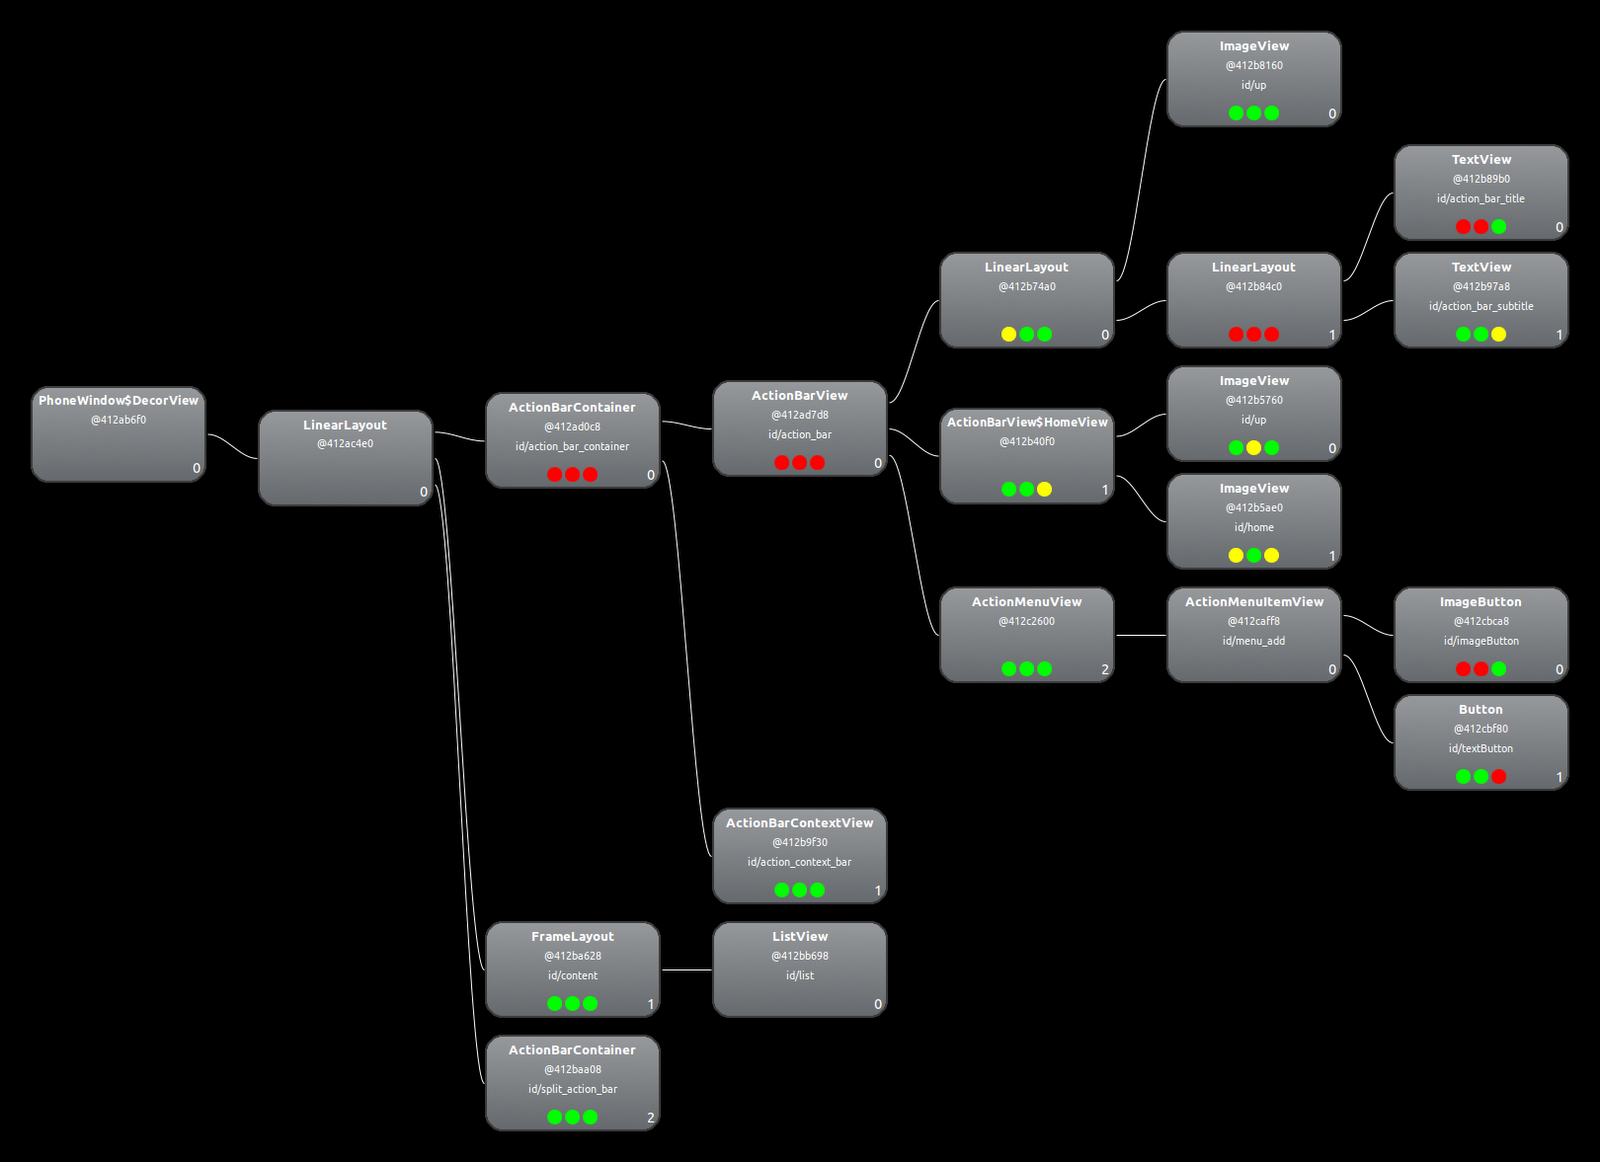
Android application is combination of multiple controls respective to functionality like to show text on screen developers use TextView, to show input field they use EditText, to show button they use Button and many other controls as

1. TextView To show text

2. EditText To show input field

3. Button To show button

4. ImageView To show multimedia image

5. ImageButton To show Image button

Each control has its own class comprise of multiple functions to work intelligently. Robotium is automated testing tool for Android applications. It identifies the control used on screen and allow user to interact with control through different ways. Robotium api provides the solo class which contains long list of functions to simulate real user actions on controls like Click, LongClick, Drag, Scroll up, Scroll Down, Click on ToggleButton etc..

To automate Android application test engineer can use both

1. Control’s native class

2. Robotium functions list for that specific controls

Like to work with TextView test engineer can use the TextView class and Robotium functions for TextView like getText, getCurrentTextViews(parent) and many others. Combination of both can make almost everything possible to automate android applications.

For new test engineers it’s quite tough to work intelligently with controls used on screen unless they know controls in brief. In this discussion/tutorial we will take each control one by one, explain its use and try to find out the combination of tricks we can use to work intelligently with these controls.

1. TextView

TextView is used to show text on screen, there can be any number of TextView controls on a screen depends upon the need of UI like a list showing results in rows may contains single TextView on each row or multiple on each row. We will go through each possible scenario and try to work with it

If there are 2 TextView controls on a screen to get their values we can use following Robotium function

String vTextViewValue = solo.getText(index).toString();

Index shows the number of TextView control used on screen, for first TextView it will be 0,

String vTextViewValue1 = solo.getText(0).toString();

and for second text view it will be 1 like.

String vTextViewValue2 = solo.getText(1).toString();

If there is a TextView control with some text we can get it using

TextView vTextView = solo.getText(“text”);

getText(“text”) will search and return the TextView control on screen matching the “text”. vTextView can use all functions of TextView class like to getId, getScaleX, getScaleY, getCurrentTextColor etc.

If there are many TextView controls in a list on a screen we will get the list on screen and then all TextView controls in that list,

ListView lvResults = solo.getCurrentListViews().get(0);

ArrayList vTextViewResults = solo.getCurrentTextViews(lvResults);

First line is getting the first list used on screen, and second line it getting all TextView controls in ArrayList. All TextView controls in specific list are stored in ArrayList, one can easily work with them.

2. EditText

EditText is used to enter text on screen, there can be any number of EditText controls on a screen depends upon the need of UI. Using Robotium we can write in EditTex and also get already written value. We will go through each possible scenario and try to work with it

If we need to enter some value in EditText on screen, we can write by using

solo.enterText(index, “value”);

the index parameter is used to call the number of Edit/Text on screen, like if there are two EditText controls on a login screen 0 is for first one and 1 is for second one on login screen,

solo.enterText(0, “username”);

solo.enterText(1, “password”);

If we want to get already written value in some EditText we can

String vEditTextValue = solo.getText(0).getText().toString();

the 0 represent the first EditText on screen, and value is saved in vEditTextValue variable. We can get the value of any EditText on screen by entering its index.

If there are many EditText controls on a screen we will get all EditText controls like,

ArrayList vEditTextesults = solo.getCurrentTextViews();

Above line will get all EditText controls on screen and save them in ArrayList, one can easily work with them.

We can get EditText like

EditText vEditText = solo.getEditText(index);

index is number of control on screen, it will return the EditText object and all functions of EditText Class of Android SDK are available to use.

We can also get EditText like

EditText vEditText = solo.getEditText(string);

string is value of control on screen, it will return the EditText object and all functions of EditText Class of Android SDK are available to use.

3. Button

Button is used on screen to click on some action, through Robotium user can click on button by,

solo.clickOnButton(index);

index shows the number of buttons on screen, if user needs to click on first button there will be 0 in place of index & 1 in case of second button on screen.

User can also click on button by identifying text written on screen like

solo.clickOnButton(string);

String shows the text visible on button, like if user needs to click on ‘Submit’ button there will be

will be

solo.clickOnButton(“Submit”);

User can also get all buttons on screen if there are many like

ArrayList vButtons = solo.getCurrentButtons();

Above line will get all Button controls on screen and save them in ArrayList, one can easily work with them.

We can get button like

Button vButton = solo.getButton(0);

0 represents the first button on screen; there will be 1 if user needs to interact with second button on screen. It will return the Button object and all functions of Button Class of Android SDK are available to use.

We can also get button like

Button vButton = solo.getButton(string);

string represents the text on button, there will be “Submit” if user needs to interact with Submit button on screen. it will return the Button object and all functions of Button Class of Android SDK are available to use.

4. ImageView

Images are used to show graphics on screen, Through Robotium user can interact with images easily

User can click on image like that, index shows the number of image on screen, user will enter 0 if there needs to click on first image on screen, and 1 if it needs to click on second image on screen

solo.clickOnImage(index)

If there are many ImageView controls on screen, user can get all of the them through Robotium like,

ArrayList vImageView = solo.getCurrentImageViews();

Above line will get all ImageView controls on screen and save them in ArrayList, one can easily work with them.

We can get button like

ImageView vImageView = solo.getImage(index);

0 represents the first image on screen; there will be 1 if user needs to interact with second button on screen. it will return the ImageView object and all functions of ImageView Class of Android SDK are available to use.

5. ImageButton

There can be button images used in Andorid Applications, Through Robotium user can easily interact with them.

User can click on imageButton like that,

solo.clickOnImageButton(index);

index shows the number of imageButton on screen, user will enter 0 if there needs to click on first imageButton on screen, and 1 if it needs to click on second imageButton on screen

If there are many ImageButton controls on screen, user can get all of the them through Robotium like,

ArrayList vImageButton = solo.getCurrentImageButtons();

Above line will get all ImageButton controls on screen and save them in ArrayList, one can easily work with them.

We can get button like

ImageButton vImageButton = solo.getImageButton(index);

0 represents the first ImageButton on screen; there will be 1 if user needs to interact with second button on screen. it will return the ImageButton object and all functions of ImageButton Class of Android SDK are available to use.

Note: Soon will upload the next parts with more controls
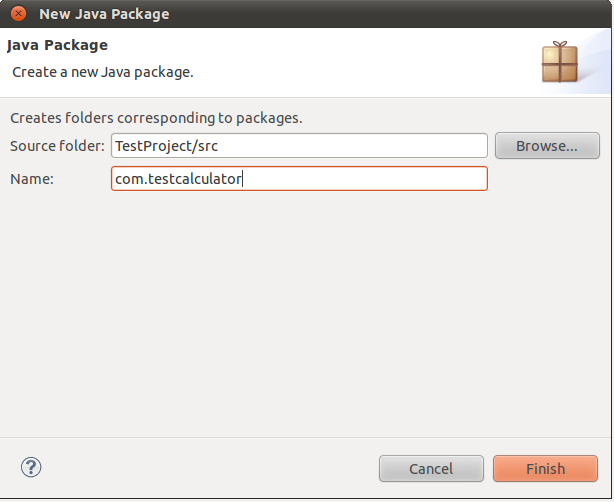
GenerateData – An open source data generator tool

Thanks to the Open Source Community for providing bunch of tools. It made our life so easy. I am software tester & during my work some times we need to generate some data for testing. Thanks to BenjaminKeen.com who provided Data Generator tool.

It is a web based tool with multiple options to generate data. Using it intelligently one make different

patterns. Generated data can be exported into multiple formats.

Features

  • (JS-enabled) browser-friendly.

  • Many data types available: names, phone numbers, email addresses, cities, states, provinces, counties, dates, street addresses, number ranges, alphanumeric strings, lorem ipsum text and more.

  • Option to generate data in XML, Excel, HTML, CSV or SQL.

  • Country specific data (state / province / county) for Canada, US, Netherlands and UK.

  • Does your laundry.

  • Saves your data generation forms for later use (downloadable version & for donators only)

It can be used on line, and one can also deploy it on its own machine with some normal requirements.

Any one can install it will following simple steps,

By using data generator we can use any number of records with any number of columns. If we need to generate data for user registration form like,

After defining columns with their required input type simple click on Generate button, and see its magic 🙂

We can use that data in manual and automate testing, and on many other areas.