1. Create Test Project
To test an Android application using Robotium, we need to create a test project with in the package (com.calculator) of specific project. We have already created our test project in last section, hope you got viewing below screen,
We will move on to design our logic to test AndroidCaculator. We need to create test case class where we will write code to test AndroidCalculator’s main class (Main.java).
2. Create Test Case
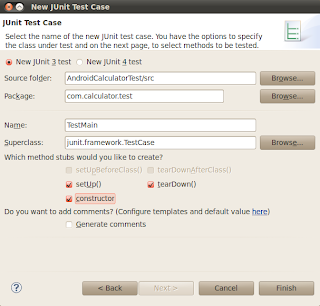
In test project from project explorer window right click on com.calculator.test select New then others. On New window expand Java and then expand Junit category and select Junit Test Case and click on Next.

On New Junit Test Case screen, most of the options will be automatically filled as we have already created test project (AndroidCalculatorTest) with project (AndroidCalculator). We need to enter the Name of Test case, which I will enter TestMain, as I am going to test (main.java) of AndroidCalculator project. On next section check Setup(), tearDown() & Constructor options and click on Finish.

A new test case by the name of TestMain will be created into com.calculator.test package of my test project (AndroidCaculatorTest).

3. Add Robotium Jar
We need to reference the Robotium jar to our project.
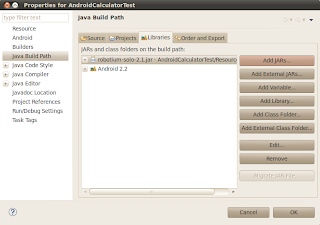
Right click on project select Build Path, and then click on Configure Build Path option. On Properties window click on Libraries tab and add Robotium jar into project.
You can download Robotium jar from http://code.google.com/p/robotium/downloads/list

4. Write Test Case Code
In our create test case we will access the contents of AndroidCalculator and do followings,
a. Call/Access first & second input controls (EditFields)
b. Enter values of our own choice
c. Access & Click on Multiply button
d. Put assert to verify their multiplication result into result field.
And add following code into TestMain.java class and save it.
package com.calculator.test;
import java.util.ArrayList;
import android.app.Activity;
import android.test.ActivityInstrumentationTestCase2;
import android.widget.EditText;
import android.widget.TextView;
import com.calculator.Main;
import com.calculator.R;
import com.jayway.android.robotium.solo.Solo;
public class TestMain extends ActivityInstrumentationTestCase2
private Solo solo;
public TestMain() {
super(“com.calculator”, Main.class);
}
@Override
protected void setUp() throws Exception {
super.setUp();
solo = new Solo(getInstrumentation(), getActivity());
}
@Override
protected void tearDown() throws Exception{
try {
solo.finalize();
} catch (Throwable e) {
e.printStackTrace();
}
getActivity().finish();
super.tearDown();
}
public void testDisplayBlackBox() {
//Enter any integer/decimal value, we will enter 10 in first editfield
solo.enterText(0, “10”);
//Enter any integer/decimal value, we will enter 20 in second editfield
solo.enterText(1, “20”);
//Click on Multiply button
solo.clickOnButton(“Multiply”);
//Verify that resultant of 10 x 20
assertTrue(solo.searchText(“200”));
}
public void testDisplayWhiteBox() {
//Defining our own values to multiply
float firstNumber = 10;
float secondNumber = 20;
float resutl = firstNumber * secondNumber ;
//Access First value (editfiled) and putting firstNumber value in it
EditText FirsteditText = (EditText) solo.getView(R.id.EditText01);
solo.enterText(FirsteditText, String.valueOf(firstNumber));
//Access Second value (editfiled) and putting SecondNumber value in it
EditText SecondeditText = (EditText) solo.getView(R.id.EditText02);
solo.enterText(SecondeditText, String.valueOf(secondNumber));
//Click on Multiply button
solo.clickOnButton(“Multiply”);
assertTrue(solo.searchText(String.valueOf(resutl)));
TextView outputField = (TextView) solo.getView(R.id.TextView01);
ArrayList currentTextViews = this.solo.getCurrentTextViews(outputField);
assertFalse(currentTextViews.isEmpty());
TextView output = (TextView) currentTextViews.get(0);
//Assert to verify result with visible value
assertEquals(String.valueOf(resutl), output.getText().toString());
}
}
5. Run Test Case
Now as we are almost done so now its time to run our test case.
Right click on TestMain.java file select Run As option and then click on Android Junit Test. It will start running Junit test.
Select the emulator or device to run the test (we will be using Android default emulator) , and wait for a while to see the magic of Robotium.
If things are going fine
1. Emulator will load, Unlock it.
2. AndroidCalculator application will load
3. It will automatically enter first & second values in First and Second EditField, and click on Multiply button (you can see all this happening as record & play scripts)
4. After successfully execution it will show green bar showing the successful execution and all results are passed.
Download AndroidCalculatorTest project code. In next section we will test android apk file with Robotium.


Is there any way to submit an integer to an application using Robotium? All the examples that I have seen appear to convert the numeric input to text.
Nop I don't thinks so, Robotium support text(string) only, but in the current case things work fine, is there any specific scenario where its not working ?
Hello,
Several days ago I'm trying to run this example on my computer and I can not do it. Specifically what happens is that when I charge the project tells me that is:
com.calculator.Main import;
com.calculator.R import;
From where I import these packages?
from already thank you very much
German
Its simple example, if everything is fine, it should work. There may be some problem at your end. Can you please share project you created, I could better find the problem?
HI, is there a way to generate reports for robotium?
I have downloaded the project and have the same problem German F. German how did you solve it?
hi,
is there any way to record the scripts automatically and then alter them just like we e can do in selenium IDE and then RC
regards:
Atif Mahmood
Atif,
That's not possible in case of Robotium so far.
Hi ,
We can record the scripts like selenium IDE for robtium too ..
Please follow the link
http://bitbar.com/tutorial/123/recording-apk
Krishna,
Thanks for suggestion, can you please suggest some opensource tool? It will really help a lot.
Hi. This tutorial is great. I was playing with the test case, wanting to get the testDisplayWhiteBox case to only access elements by reference.
I changed the line:
solo.clickOnButton("Multiply");
to
solo.clickOnButton(R.id.Button01);
But now the test case fails. It reports that there "is no Button with index 2131034115".
Is there some way I can get the script to click on the button by reference to the label on the button?
Hi,
Thanks for the appreciation,
For white testing you will have to set you AUT's package name as Target Package during creating your TestProject.
You can see that in first screen shot of this tutorial.
Good luck
Actually, I do have that configured correctly. The problem was I was trying to use the integer identifier. I need to use the integer index of the button on the screen.
Hi all,
I try to run robotium from the ubuntu terminal and its works fine, but now i want to pass the arguments (like, wants to run the test 100 times or 200 times) at the time of running from the command line(terminal). How can i do that using ubuntu terminal??
hi,
I want to do cts test, but it's looking very complex to me. Can any one help me out by describing the cts test from the beginning. Means after setting up android sdk and avd plugins then what we have to do for doing CTS test. Please reply soon.. 🙂
Yap sure, can you share more details on your CTS test, then I can suggest something….
can u give link for robotium testing tool free download??
http://code.google.com/p/robotium/downloads/list
I have read your blog its very attractive and impressive. I like your blog
selenium Online Course
Good post…..I appreciate yor way of writing that make the blog attractive and make reader to hold longer to your blog.
Regression Testing Services
Functional Testing Services
Performance Testing Services